For Users
This section explains what the extension is, how it protects your privacy, and how to install it on your personal browser.
1. Introduction
Notmining AI Shield is a browser extension designed to act as a Data Loss Prevention (DLP) tool for both personal and corporate environments. It passively monitors user interactions with Artificial Intelligence platforms (such as ChatGPT, Claude, Copilot, etc.) and blocks the leakage of sensitive data like SSNs, credit cards, passwords, or custom regular expressions.
2. Key Blocking Features
The extension operates at the browser layer and applies multiple restrictions to ensure information does not leave the endpoint:
- Clipboard Analysis (Paste): Instantly blocks copying and pasting of sensitive data, preventing the user from massively inputting protected information into the AI chat.
- Overwrite Mode (Data Masking / Redaction): Allows configuring the extension so that, instead of completely blocking the action, it automatically masks the detected sensitive data (replacing it with custom tags). This allows the user to safely continue their work without friction.
- PowerShell / Terminal Anti-Copy: Detects and blocks copying and pasting of terminal commands, scripts, or execution traces that could reveal network structure or internal configurations.
- File Upload Blocking: Prevents the reading of confidential files that the user attempts to drag & drop or attach by clicking into the AI chat.
- Multi-tab Monitoring: Continuously protects all active tabs that match the target domains configured by the administrator.
- Remote Policy Synchronization: Allows configuring a centralized URL from which the extension will automatically download the latest rules, regular expressions, and settings (supports AES-256 encryption for added security).
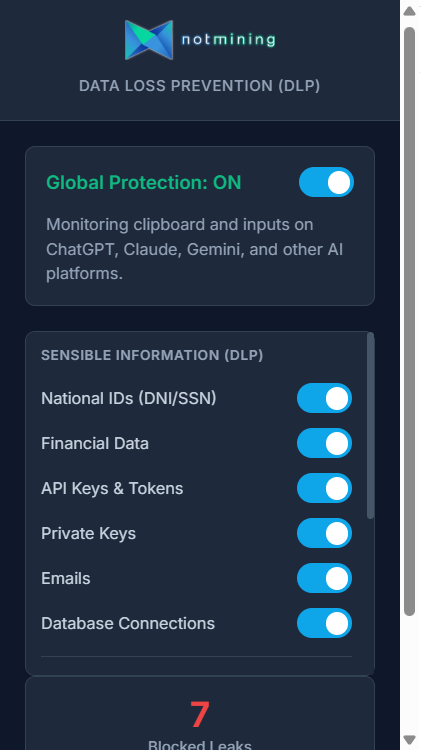 Configuration panel visible to the end user.
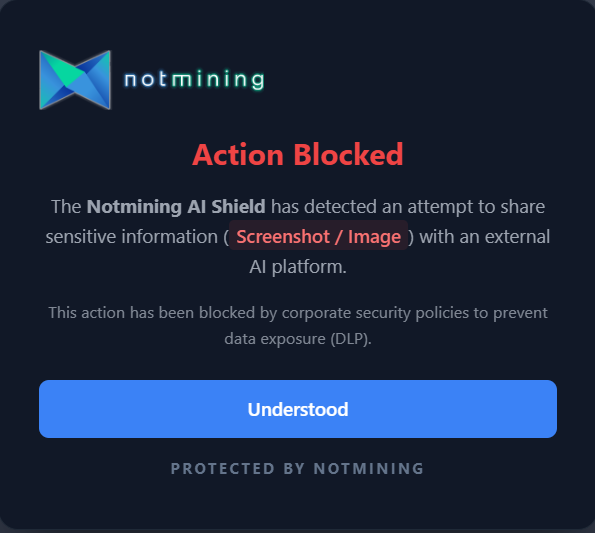 Alert displayed to the user when a data leak attempt is blocked.
3. Installation for Users (Step-by-Step)
Currently, the extension is distributed privately as a ZIP file. To install it manually on your personal browser, follow these simple steps:
- Download the file: Click the "Download extension" button (in the sidebar) and save the
notmining-ai-shield.zipfile to your computer. - Extract the file: Right-click the downloaded ZIP file and select "Extract All...". Save the extracted folder in a secure location (e.g., your Documents folder). Important: Do not delete this folder after installation.
- Open extensions:
- On Chrome: Type
chrome://extensions/in the address bar and press Enter. - On Edge: Type
edge://extensions/in the address bar and press Enter.
- On Chrome: Type
- Enable Developer Mode: In the top right corner (or bottom left on Edge) of that screen, you will see a toggle called Developer mode. Make sure it is turned on.
- Load the extension: Three new buttons will appear at the top. Click on Load unpacked.
- Select the folder: Browse to and select the folder you extracted in step 2 (make sure you select the folder that contains the
manifest.jsonfile inside). - Done!: The Notmining AI Shield extension is now installed and active. We recommend pinning it to your top bar by clicking the "puzzle" icon and clicking the pin (or eye on Edge) icon next to the extension.
For Enterprises
This technical section is intended for system administrators and SOC (Security Operations Center) teams looking to deploy the extension centrally.
4. Installation and Deployment for Administrators (GPO)
For Enterprise environments, manual installation is not feasible. The extension must be centrally and silently managed and installed across all organization endpoints via Windows Group Policy Objects (GPO) using the schema.json file.
4.1. Silent Extension Deployment (Force Install)
To force the installation of the extension on all corporate browsers without user intervention, you can choose between two main methods using the Google Chrome or Microsoft Edge Administrative Templates (ADMX/ADML) installed on your Domain Controller:
Option A: Via Chrome Web Store / Edge Add-ons (Coming Soon)
This is the recommended option, as it ensures all endpoints receive transparent and automatic security updates. Once published:
- Open the Group Policy Management Console (GPMC).
- Navigate to:
Computer Configuration > Policies > Administrative Templates > Google > Google Chrome > Extensions(For Edge:... > Microsoft > Microsoft Edge > Extensions). - Edit the policy Configure the list of force-installed apps and extensions (Control which extensions are installed silently).
- Enable it and add the official extension ID from the store along with the official update URL (e.g.,
[EXTENSION_ID];https://clients2.google.com/service/update2/crxfor Chrome).
Option B: Offline Installation or Internal Server (Sideloading)
For testing or highly restricted environments:
- You must package the extension (create the
.crxfile) and generate an update XML file. Host both on an internal web server accessible by the endpoints. - In the force-install policy mentioned above, add the extension ID and your internal server URL (e.g.,
[EXTENSION_ID];https://my-internal-server.local/extension_update.xml).
Liability Disclaimer: The configuration and implementation of Group Policy Objects (GPO) described in this documentation have a direct impact on the behavior of corporate browsers and endpoints. It is the sole responsibility of the system administrator to thoroughly review the policies and conduct testing in pre-production environments before general deployment. Fort5d Group S.L. is not liable for potential data loss, service interruptions, accidental blocks, or any other consequences resulting from the misconfiguration of these policies in production environments.
4.2. Policy Template and Configuration (Managed Storage)
Once the extension is deployed, the administrator must inject the configuration. In Chrome, this is done via third-party extension policies (Managed Storage). These policies (based on our schema.json) ensure the extension acts autonomously and block any modification by the end user.
Administrators can enforce the configuration of the following fields in the template:
- Target Domains (customDomains): URLs where the extension will be active. The administrator can freely add or remove domains (e.g.,
chatgpt.com,claude.ai). It also allows setting specific path restrictions (e.g.,m365.cloud.microsoft/chat) to limit action only to those areas and leave the rest of the domain as an exception. - SIEM Webhook (siemWebhookUrl): The endpoint URL (Collector) where logs will be sent.
- Log Format (logFormat): The standard format the SIEM expects (CEF, LEEF, Syslog, CSV, JSON).
- User Identifier (endpointIdentifier): Username, email, or hostname (e.g.,
jdoe-laptop) to identify who triggered the alert. The extension also auto-generates a unique UUID per device (device_id) for tracking. - Encryption Key (siemEncryptionKey): Shared secret or password used for AES-256-GCM encryption of the payload before sending it to the SIEM.
- Justification Bypass (allowBypass): Allows specific user groups to temporarily bypass a DLP block (60 seconds) by providing a written justification, which will be audited.
- Custom Regular Expressions (customRegexes): Allows injecting custom detection rules (e.g., medical record numbers, internal invoice formats).
4.3. Domain Policy Implementation
To distribute this configuration (the policy template) to all domain computers, the administrator has two main options:
Option A: Group Policy Preferences (GPP - Recommended)
The most structured way to inject the schema.json configurations is by creating the registry keys via GPO Preferences:
- In GPMC, edit your policy and navigate to
Computer Configuration > Preferences > Windows Settings > Registry. - Create a new Registry Item for each setting you want to enforce (e.g.,
siemWebhookUrl,customDomains, etc.). - The base Key Path will vary depending on the browser:
- For Chrome:
SOFTWARE\Policies\Google\Chrome\3rdparty\extensions\[EXTENSION_ID]\policy - For Edge:
SOFTWARE\Policies\Microsoft\Edge\3rdparty\extensions\[EXTENSION_ID]\policy
- For Chrome:
- Select the appropriate value type (REG_SZ for strings and JSON arrays, REG_DWORD for booleans like
allowBypass).
Option B: Direct Registry File (.reg)
Alternatively, you can import the configuration directly into the Windows Registry on the endpoints. Here is an example of the base template (you can include both paths in the same file):
Windows Registry Editor Version 5.00

; Configuration for Google Chrome
[HKEY_LOCAL_MACHINE\Software\Policies\Google\Chrome\3rdparty\extensions\EXTENSION_ID\policy]
"customDomains"="[\"chatgpt.com\", \"claude.ai\", \"m365.cloud.microsoft/chat\"]"
"siemWebhookUrl"="https://siem.mydomain.local:8088/services/collector"
"logFormat"="JSON"
"siemEncryptionKey"="M1_S3cr3t_K3y_S0C"
"allowBypass"=dword:00000001
"endpointIdentifier"="LAPTOP-%USERNAME%"
"customRegexes"="[{\"name\": \"Medical Record\", \"pattern\": \"EXP-\\\\d{6}\", \"active\": true}]"

; Configuration for Microsoft Edge
[HKEY_LOCAL_MACHINE\Software\Policies\Microsoft\Edge\3rdparty\extensions\EXTENSION_ID\policy]
"customDomains"="[\"chatgpt.com\", \"claude.ai\", \"m365.cloud.microsoft/chat\"]"
"siemWebhookUrl"="https://siem.mydomain.local:8088/services/collector"
"logFormat"="JSON"
"siemEncryptionKey"="M1_S3cr3t_K3y_S0C"
"allowBypass"=dword:00000001
"endpointIdentifier"="LAPTOP-%USERNAME%"
"customRegexes"="[{\"name\": \"Medical Record\", \"pattern\": \"EXP-\\\\d{6}\", \"active\": true}]"
Option C: Companies without Active Directory (Manual Distribution or MDM)
If your organization does not have an Active Directory domain (AD) and lacks centralized GPO policies, you can configure the extension very simply using a registry script (.reg). This method is ideal for SMBs or devices disconnected from the domain:
- Open Notepad, copy the code from the block above (Option B), and adjust the values to your needs (your SIEM URL, secret key, allowed domains, etc.).
- Save the file to your desktop as
config_ai_shield.reg(ensure the extension is .reg and not .txt). - Distribute this file to your employees (via email, shared folder, intranet, or USB), or deploy it via your RMM/MDM tool (Intune, NinjaOne, etc.).
- The employee (or the RMM script) simply needs to double-click the .reg file and accept the Windows security warning. The configuration will be applied instantly, the extension will be protected without the user being able to modify it from the panel, and it will begin sending logs.
Note: All this configuration can also be set manually from the Admin Panel inside the extension itself (password protected), although forcing these values via GPO is highly recommended for corporate environments.
Security Note: It is recommended that administrators disable Incognito/InPrivate mode via GPO to prevent users from evading the DLP.
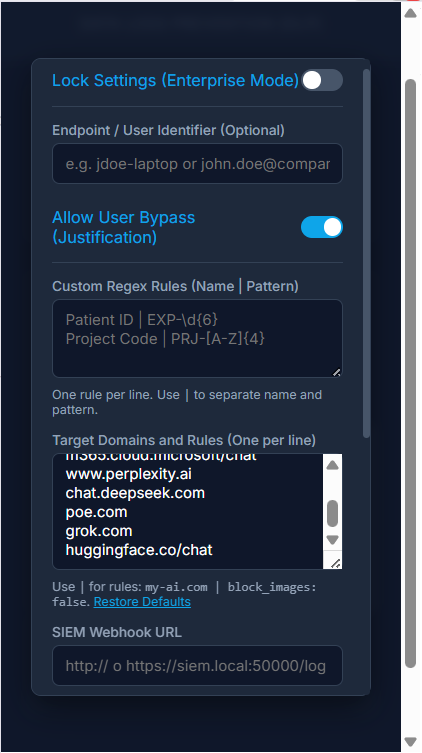 Manual configuration panel for administrators.
5. SIEM Integration and Log Forwarding
Notmining AI Shield is designed to integrate natively with major market SIEMs (Splunk, QRadar, ArcSight, Microsoft Sentinel, etc.). The integration is done via direct HTTP/HTTPS pushes from the user's browser to the SIEM collector, without the need for intermediate servers.
Integration Steps:
- Enable an HTTP Collector on the SIEM: Configure your SIEM to receive events via HTTP/HTTPS. For example, enable an HTTP Event Collector (HEC) in Splunk, or an HTTP Receiver in QRadar. Make sure to get the endpoint URL and, if required, the authentication token (which can be included in the URL itself).
- Configure the Extension via GPO: In the
schema.jsonfile or the admin panel, set thewebhookUrlpolicy to your collector's address (e.g.,https://siem.mydomain.local:8088/services/collector). - Select the Log Format: Set the
logFormatpolicy to the format your SIEM expects (JSON, CEF, LEEF, Syslog, or CSV). - Data Reception: Every time the extension blocks or audits a data leak attempt, it will automatically send a
POSTrequest to the configured URL with the formatted log.
Supported Formats and Payload Examples
Depending on the chosen format, the POST request payload will vary to fit your SIEM's ingestion standards. Here is an example of what a block event for detecting an SSN would look like in JSON format:
{
  "timestamp": "2026-04-23T10:30:00Z",
  "action": "blocked",
  "url": "chatgpt.com",
  "matchedRule": "National ID (DNI/NIE/SSN)",
  "matchedContent": "[ENCRYPTED_PAYLOAD]",
  "userJustification": ""
}
And the same event structured in CEF (ArcSight) format:
CEF:0|Notmining|AI Shield|1.2.0|DLP_BLOCK|DLP Policy Violation|7|act=blocked request=chatgpt.com msg=National ID (DNI/NIE/SSN) cs1Label=EncryptedContent cs1={"encrypted":true,"algorithm":"AES-256-GCM","iv":"...","ciphertext":"..."}Connection Testing
Once the SIEM URL is configured in the panel, you must activate the Lock Settings (Enterprise Mode) toggle. If this mode is not enabled, the extension will not send logs externally for privacy reasons. To verify that the SIEM (or receiver script) is reachable, you can use the Test Connection button in the panel, which will perform an automatic Healthcheck. If the endpoint responds correctly, you will see a green success indicator (Connected).
Wazuh Integration
Wazuh does not have a native "HTTP Webhook Receiver" open by default for ingesting arbitrary logs (its REST API is primarily used for management and querying, not for massive single-event ingestion). Furthermore, it is not feasible for the agent to read Chrome's internal database (LevelDB) due to browser process lock restrictions.
Therefore, the officially supported and recommended method in Wazuh environments is to deploy a simple Python script (or tools like Logstash/Fluentd) acting as an intermediate server: it will receive the HTTP webhook from the extension in real-time, decrypt the content (using your key), and write it cleanly to a standard local text file (e.g., /var/log/notmining_dlp.log) that the Wazuh agent can easily ingest via <localfile>.
1. Receiver Script (Python):
from flask import Flask, request
import json
import logging
import base64
from cryptography.hazmat.primitives.ciphers.aead import AESGCM
from cryptography.hazmat.primitives import hashes
from cryptography.hazmat.primitives.kdf.pbkdf2 import PBKDF2HMAC
import os
from flask_cors import CORS
import logging

# Disable default Flask (Werkzeug) logger to keep console/logs clean
log = logging.getLogger('werkzeug')
log.disabled = True

app = Flask(__name__)
CORS(app) # Allow Cross-Origin requests from the Chrome extension

LOG_FILE = '/var/log/notmining_dlp.log'

# Use a specific logger and ensure no old handlers are present
logger = logging.getLogger('wazuh_logger')
logger.setLevel(logging.INFO)

# Avoid adding multiple handlers if the script is reloaded
if not logger.handlers:
    file_handler = logging.FileHandler(LOG_FILE, mode='a')
    file_handler.setFormatter(logging.Formatter('%(message)s'))
    logger.addHandler(file_handler)

# Must match the "siemEncryptionKey" set in GPO / Extension
SHARED_SECRET = "MiSuperPassword123"

# Token to prevent fake log injection. Must match "siemAuthHeader"
EXPECTED_AUTH_HEADER = "Bearer mi_token_secreto"

def decrypt_payload(encrypted_obj, password):
    try:
        kdf = PBKDF2HMAC(
            algorithm=hashes.SHA256(),
            length=32,
            salt=b'notmining_salt',
            iterations=100000,
        )
        key = kdf.derive(password.encode())
        aesgcm = AESGCM(key)

        iv = base64.b64decode(encrypted_obj['iv'])
        ciphertext = base64.b64decode(encrypted_obj['ciphertext'])

        decrypted_data = aesgcm.decrypt(iv, ciphertext, None)
        return decrypted_data.decode('utf-8')
    except Exception as e:
        return f"[DECRYPTION_FAILED] {str(e)}"

@app.route('/', methods=['GET'])
def health_check():
    return {"status": "Wazuh Webhook Receiver is running"}, 200

@app.route('/webhook', methods=['POST', 'OPTIONS'])
def siem_webhook():
    # Handle Chrome Preflight (CORS) requests
    if request.method == 'OPTIONS':
        return '', 204

    # Verify authentication
    auth_header = request.headers.get('Authorization', '')
    if auth_header != EXPECTED_AUTH_HEADER:
        return {"error": "Unauthorized", "message": "Invalid token"}, 401

    # Support both JSON and plain text (Syslog/CEF)
    data = request.json if request.is_json else request.get_data(as_text=True)

    # If the extension sent the payload encrypted
    if data and isinstance(data, dict) and data.get('encrypted'):
        decrypted_str = decrypt_payload(data, SHARED_SECRET)
        if decrypted_str.startswith("[DECRYPTION_FAILED]"):
            data = {"error": "Decryption failed.", "raw": decrypted_str}
        else:
            try:
                data = json.loads(decrypted_str)
            except json.JSONDecodeError:
                data = decrypted_str # It was encrypted Syslog

    # Force system time in the log (Wazuh needs the correct time for alerts)
    current_sys_time = datetime.now().astimezone().isoformat()

    if isinstance(data, dict):
        if 'timestamp' in data:
            data['timestamp'] = current_sys_time
        logger.info(json.dumps(data))
    else:
        data = re.sub(r'\d{4}-\d{2}-\d{2}T\d{2}:\d{2}:\d{2}(?:\.\d+)?Z?', current_sys_time, data, count=1)
        logger.info(data)

    return {"status": "success"}, 200

if __name__ == '__main__':
    # SECURITY NOTE: By default, it listens on 127.0.0.1 (localhost) to avoid exposing
    # the port on all network interfaces, which is insecure.
    # If you need to receive logs from other machines, change this to '0.0.0.0', but
    # make sure to restrict access to port 8088 using a firewall (iptables/ufw).
    app.run(host='127.0.0.1', port=8088)
2. Wazuh Agent Configuration (ossec.conf):
Add the following block to the configuration of the Wazuh agent running on the same server as the Python script:
<localfile>
  <log_format>json</log_format>
  <location>/var/log/notmining_dlp.log</location>
</localfile>
End-to-End (E2E) Encryption and Internal Networks
The security of logs in transit is a priority:
- E2E Encryption: The intercepted content (the text the user tried to send to the AI) travels encrypted within the payload. Even if the traffic is intercepted, the actual sensitive data remains obfuscated.
- Transport Flexibility: Although using HTTPS for the SIEM Webhook is highly recommended, the extension allows plain HTTP. This is specifically designed for corporate environments where traffic is routed through an internal VPN or trusted segmented networks, reducing the overhead of SSL certificate management on internal collectors without compromising data security (thanks to the E2E payload encryption).
6. Bypass Auditing ("Justification Mode")
When the allowBypass policy is active, users who are blocked will see a "I need to send this" button on the main alert.
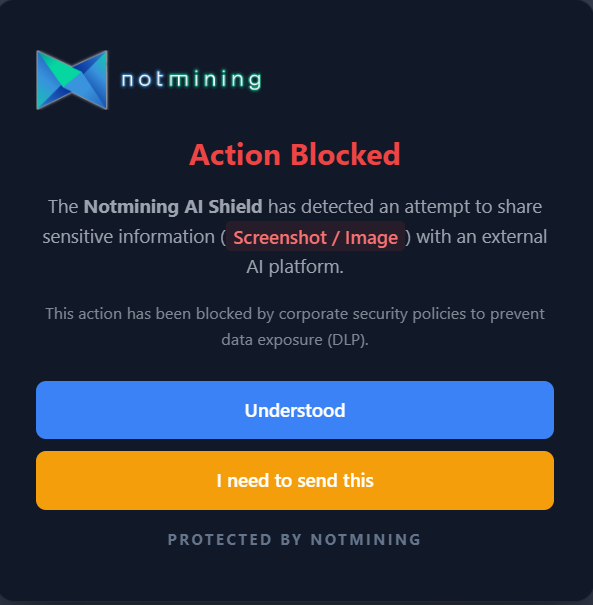 The user can request a temporary exception if their use case is legitimate.
If they choose to use it, they will be required to explain why they need to send the data (e.g., "It is open-source source code").
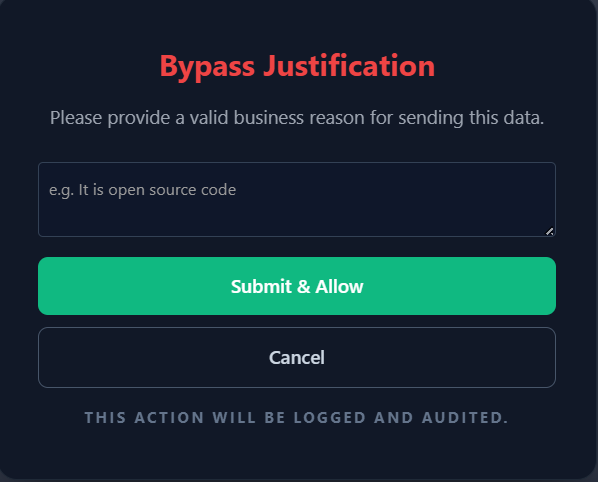 Form where the employee writes the justification for the cybersecurity team.
Upon confirming, the extension pauses blocking for 60 seconds. Immediately, an event is sent to the SIEM with action: "bypassed" and the justification field populated, allowing the SOC team to audit the action retroactively and detect potential trust abuse.